Some of the lighting checkers that I designed and built for akromatic.
Check them all at http://www.akromatic.com
Projecting details in Zbrush /
- Export the lowest subdivision model.
- Export the highest resolution model.
- Work on the uv mapping using the lowest resolution model.
- Go back to Zbrush and import the high resolution model.
- Now import the low resolution model.
- Select the high resolution model and go to Subtool -> Insert -> and select the low resolution model.
- Once inserted you will see both models overlapped in the viewport.
- You need to be complete sure that only the two models that you’re interest on are shown. All the additional stuff that you would have in your zbrush scene should be hidden.
- Select the low resolution model and subdivide it as much as you need.
- Store a Morph Target so you can always come back to the starting point in case that you need it in the near future. (and you will).
- With the low model selected go to Subtool -> Project -> Project All
- The most important parameters are Distance and PA Blur. Try to use low values as Distance and keep blur to 0. This is a trial and error process. Default distance value is a really good starting point.
- Once the projecting process is done, check your model.
- If you find big errors in the mesh try to use a Morph brush to reveal your original mesh. Remember that we stored a Morph Target while ago. Revealing the original model you can easily remove projection artifacts and sculpt quick fixes.
- You are ready to export the displacement maps for this model. Just select the low resolution model and go back to the lowest subdivision level.
- Check the screenshots to see the parameters that I’m using for 16bits 32bits and vector displacement.
- Check the final displacement maps.
You can watch a detailed video tutorial with all these steps here, only available in Spanish.
Si quieres puede ver aquí un videotutorial con todos estos pasos y explicaciones más detalladas.
The Lone Ranger /
Flat video with Nikon D800 /
If you ever tried to record high quality video with your digital SLR you already realized that the default video settings are not bad at all, but when you try to color correct the footage in Colorista, SpeedGrade or whatever grading software you usually use, that footage is not the best one to play with.
That’s obviously because the camera has baked some s-curve with grading information in to your footage. By default the “standard” curve is applied to your footage, and if you only want to record something quickly that’s probably fine.
But as I said, If you are interested on color correcting and post-processing your footage, you will have to do something with that standard curve.
The best way to start is probably flattening your footage in the camera. With this flatten or neutral images, all the color processing done in post will be smooth, and specially the blacks and whites of your footage won’t be clamped out as quickly as using the standard curve.
The only thing that you need to do is setting up the color profiles in your camera like the below image. And don’t worry about your still photography, it always use RAW which means that is not affected by this color profiles. Actually the .jpg versions will be, but I assume you always shot in RAW.
And these are some quick tests comparing the standard curve with the neutral curve.
Vittorio Storaro /
Nice documentary featuring one of the greatest cinematographers of all time.
Latest promotional clips for The Lone Ranger /
New clips for The Lone Ranger.
It will be out in cinemas quite soon.
akromatic.com /
I recently launched akromatic.com a new site dedicated to vfx photography.
We’ll be posting there a new beautiful high resolution panorama for 3D lighting every two weeks.
You will find also HDRI rig checkers for your shootings.
Just go to akromatic.com and let me know your thoughts.
Enjoy!
Roger Deakins talks with John de Borman /
Very interesting and inspirational conversation with Roger Deakins, as usual.
byWord /

At the beginning of the days I used my iPad just for fun but now I use it in a professional way for a lot of different tasks.
This time I’d like to talk to you about one of the applications that I most use on my iPad every single day.
I’m talking about byWord.
It’s a simple text editing software for Mac, iPad and iPhone. Nothing fancy here you might think, and you’re probably true, but the good thing about byWord is that you don’t need to think about anything but writing.
byWord is simple, clear, tidy and will keep you focus on writing, that’s it.
I use it for all writing related stuff, from blogging to outline courses. From planning shootings to write emails. You won’t be distracted by things like type fonts, colors or menu tools.
byWord has nice features like syncing with Dropbox or iCloud, so you can keep all your content in different devices or in the cloud.
Another nice feature is the dark theme which turns your screen to black and your text to white.
This is very useful for dailies sessions, you can write down feedback easily from your vfx supe under dark light conditions in the daily room.
I usually write a few words and then on my desk I just expand all this key words to complete a text with the whole feedback given and a small strategy to address it.
If you are involved in writing related tasks go to http://www.bywordapp.com and give it a try.
Trixter work in Iron Man 3 /
Some of the work done at Trixter Munich where I was lucky enough to be part of the team last year.
Iron Man 3 breakdown /
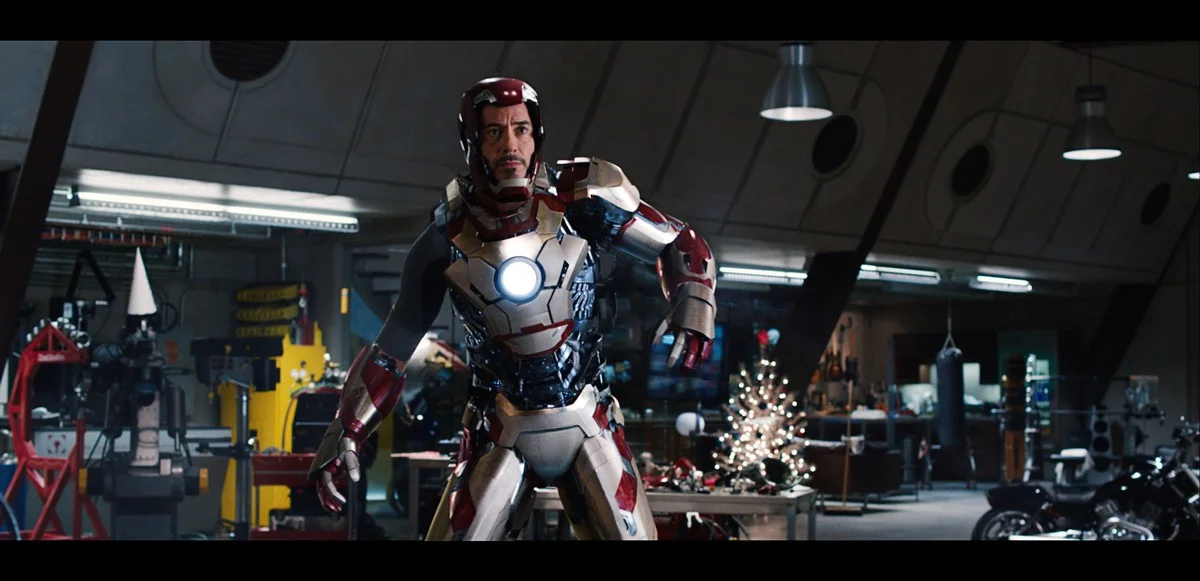
Nice little article by fxguide about Iron Man 3 where you can see some of my work at Trixter Munich.
Enjoy.
Jeff Bridges photography /

Import layer masks in Mari 2 /
Lets say that importing masks in to Mari 2 created in other software, is something very common and all the texture artist out there do every single day.
I’m talking about painted masks in Photoshop or Nuke, or baked masks in Maya, Softimage or just cavities, occlusions and other important maps generated in Zbrush or Mudbox.
Using all these programs and more is something pretty normal in any VFX boutique nowdays.
When I started working with the first alpha version of Mari 2 I found a bit tricky the way to import maps generated in others software packages in to Mari as layer masks.
The way to paint layer masks in Mari seems to be pretty straightforward but as I said if you want to import a texture as layer mask you need to follow some steps.
I’m pretty sure that if you are a new Mari 2 user you can’t find how to do this before spend some time struggling your mind to figure out how to do this simple thing.
I spent probably more than 30 minutes to find this out and just realize that a lot of texture artist are having the same problems to find a way to do it.
So, follow these steps to import layer masks in to Mari and save your precious time :)
And of course, if you have another fastest way to do it, I’ll be glad to hear it.
- Import you mask as new layer.
- Add a reveal layer mask to the layer that you want to mask with your imported map.
- Make a mask group.
- Double click on the mask group icon to open the masks window.
- Drag your imported mask layer to the list.
- Remove the previous mask created by default.

- Yo can invert the mask if needed.
- Done, your imported mask is working perfectly.
Percy Jackson 2: Sea of Monsters /
I’ve been working quite hard on this over the last few months at MPC London.
New trailer for The Lone Ranger /
The new trailer for The Lone Ranger has been released today, and it looks superb!
I worked on this project for quite a while at MPC.
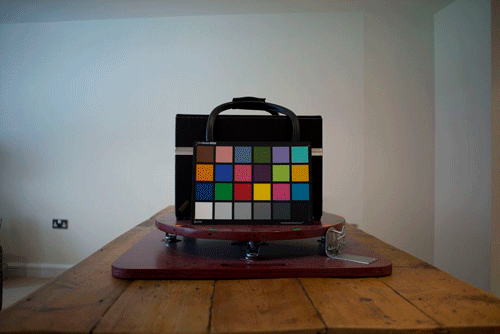
Base for shooting references /
I built this rotating base for shooting references for modeling and texturing purposes.
Seems to work pretty good with a wide range of sizes from small objects to people around 1.85 cm and 80 kg.
It has two diferent positions, for 8 shots (45 degrees) and 16 shots (22,5 degrees).

Dark Shadows VFX breakdown /
MPC has published the VFX breakdown for Tim Burton’s Dark Shadows. You can see some of my texturing work on that project.
Enjoy.
Louvre HDRI panorama /
Check my latest high res panorama for 3D lighting, this time shoot in the Louvre museum in Paris, France.
Please contact me if you need color, lighting and reflection references for this one.
Cheers.
Worl War Z trailer /
Did you watch the new World War Z trailer?
I worked on this movie while ago at MPC London.
Just run :)
New Iron Man 3 trailer /
The new spectacular Iron Man 3 trailer is out.
I was helping out the texturing and look-dev teams at Trixter while ago.
Hope you like it.